


目录前言一、安装配置jdk二、搭建Maven三、搭建Nexus四、批量上传jar包五、maven setting文件配置,pom.xml配置前言Maven私服是:公司在自己的局域网内搭建的 maven远程仓库服务器,每个员工的电脑上安装...
目录
Maven私服是:公司在自己的局域网内搭建的 maven远程仓库服务器,每个员工的电脑上安装 maven 软件并且连接私服服务器,员工将自己开发的项目打成 jar 并发布到私服服务器,其它项目组就可以从私服服务器下载所依赖的组件(jar)
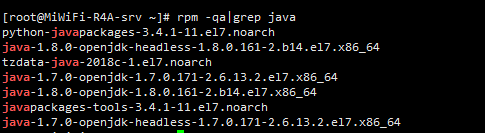
查询系统是否已安装jdk
rpm -qa|grep java
卸载已安装的jdk
rpm -e --nodeps java-1.8.0-openjdk-1.8.0.161-2.b14.el7.x86_64rpm -e --nodeps java-1.8.0-openjdk-headless-1.8.0.161-2.b14.el7.x86_64rpm -e --nodeps java-1.7.0-openjdk-1.7.0.171-2.6.13.2.el7.x86_64rpm -e --nodeps java-1.7.0-openjdk-headless-1.7.0.171-2.6.13.2.el7.x86_64
验证是否已经卸载
rpm -qa|grep javajava -version
在usr下创建software目录 , 将 jdk-linux-x64.tar.gz 上传至该文件夹
mkdir /usr/software
解压 jdk-linux-x64.tar.gz
tar -zxvf /usr/software/jdk-linux-x64.tar.gz
配置JDK环境变量,编辑 /etc/profile 文件
vi /etc/profile
先将光标(可以使用快捷键Shift+g)移到最后一行,然后输入 i 进入编辑状态,粘贴如下内容,输入Esc 进入命令模式 输入:wq! 保存修改信息
export JAVA_HOME=/usr/software/jdk1.8.0_131export PATH=$JAVA_HOME/bin:$PATH
配置文件生效
source /etc/profile
测试 JDK 安装
java -version
将 apache-maven-3.6.1-bin.tar.gz 上传至 /usr/software
解压 apache-maven-3.6.1-bin.tar.gz
tar -zxvf /usr/software/apache-maven-3.6.1-bin.tar.gz
配置Maven环境变量
vi /etc/profile
先将光标(可以使用快捷键Shift+g)移到最后一行,然后输入 i 进入编辑状态,粘贴如下内容,输入Esc 进入命令模式 输入:wq! 保存修改信息
export JAVA_HOME=/usr/software/jdk1.8.0_131export MAVEN_HOME=/usr/software/apache-maven-3.6.1export PATH=$JAVA_HOME/bin:$MAVEN_HOME/bin:$PATH
配置文件生效
source /etc/profile
测试maven安装
mvn -version
将 nexus-3.9.0-01-unix.tar.gz 上传至 /usr/software
解压 nexus-3.9.0-01-unix.tar.gz
tar -zxvf nexus-3.9.0-01-unix.tar.gz
定位到nexus-3.9.0-01/bin目录下 , 修改nexus文件
# 先定位到usr/software目录下cd /usr/software/nexus-3.9.0-01/bin/# 修改nexus文件vi nexus
修改文件的内容为:
run_as_user='root'run_as_root=false
修改nexus-3.9.0-01/etc/nexus-default.properties配置表中属性
# Nexus服务监听的端口;application-port=8081# Nexus服务监听的主机;application-host=0.0.0.0# Nexus服务的上下文路径nexus-context-path=/
开放8081端口号
firewall-cmd --add-port=8081/tcp --permanentfirewall-cmd --reload
启动nexus
#使用cd命令 定义到/usr/software/nexus-3.20.1-01/bin目录下cd /usr/software/nexus-3.20.1-01/bin# 启动Nexus admin123# ./nexus run./nexus start
账号:admin 密码:admin123
1、先将本地maven/localrepository仓库打一个完整的zip压缩包,上传至/opt
2、解压localrepository.zip,进入/opt/localrepository目录
3、创建脚本 touch mavenimport.sh,写入以下内容;
#!/bin/bash# copy and run this script to the root of the repository directory containing files# this script attempts to exclude uploading itself explicitly so the script name is important# Get command line paramswhile getopts ":r:u:p:" opt; docase $opt in r) REPO_URL="$OPTARG" ;; u) USERNAME="$OPTARG" ;; p) PASSWORD="$OPTARG" ;;esacdonefind . -type f -not -path './mavenimport\.sh*' -not -path '*/\.*' -not -path '*/\^archetype\-catalog\.xml*' -not -path '*/\^maven\-metadata\-local*\.xml' -not -path '*/\^maven\-metadata\-deployment*\.xml' | sed "s|^\./||" | xargs -I '{}' curl -u "$USERNAME:$PASSWORD" -X PUT -v -T {} ${REPO_URL}/{} ;4、输入chmod a+x mavenimport.sh进行可执行授权
chmod a+x mavenimport.sh
5、执行导入命令 (注意:将地址换成自己的私服地址)
./mavenimport.sh -u admin -p admin123 -r http://ip:8081/repository/maven-releases/
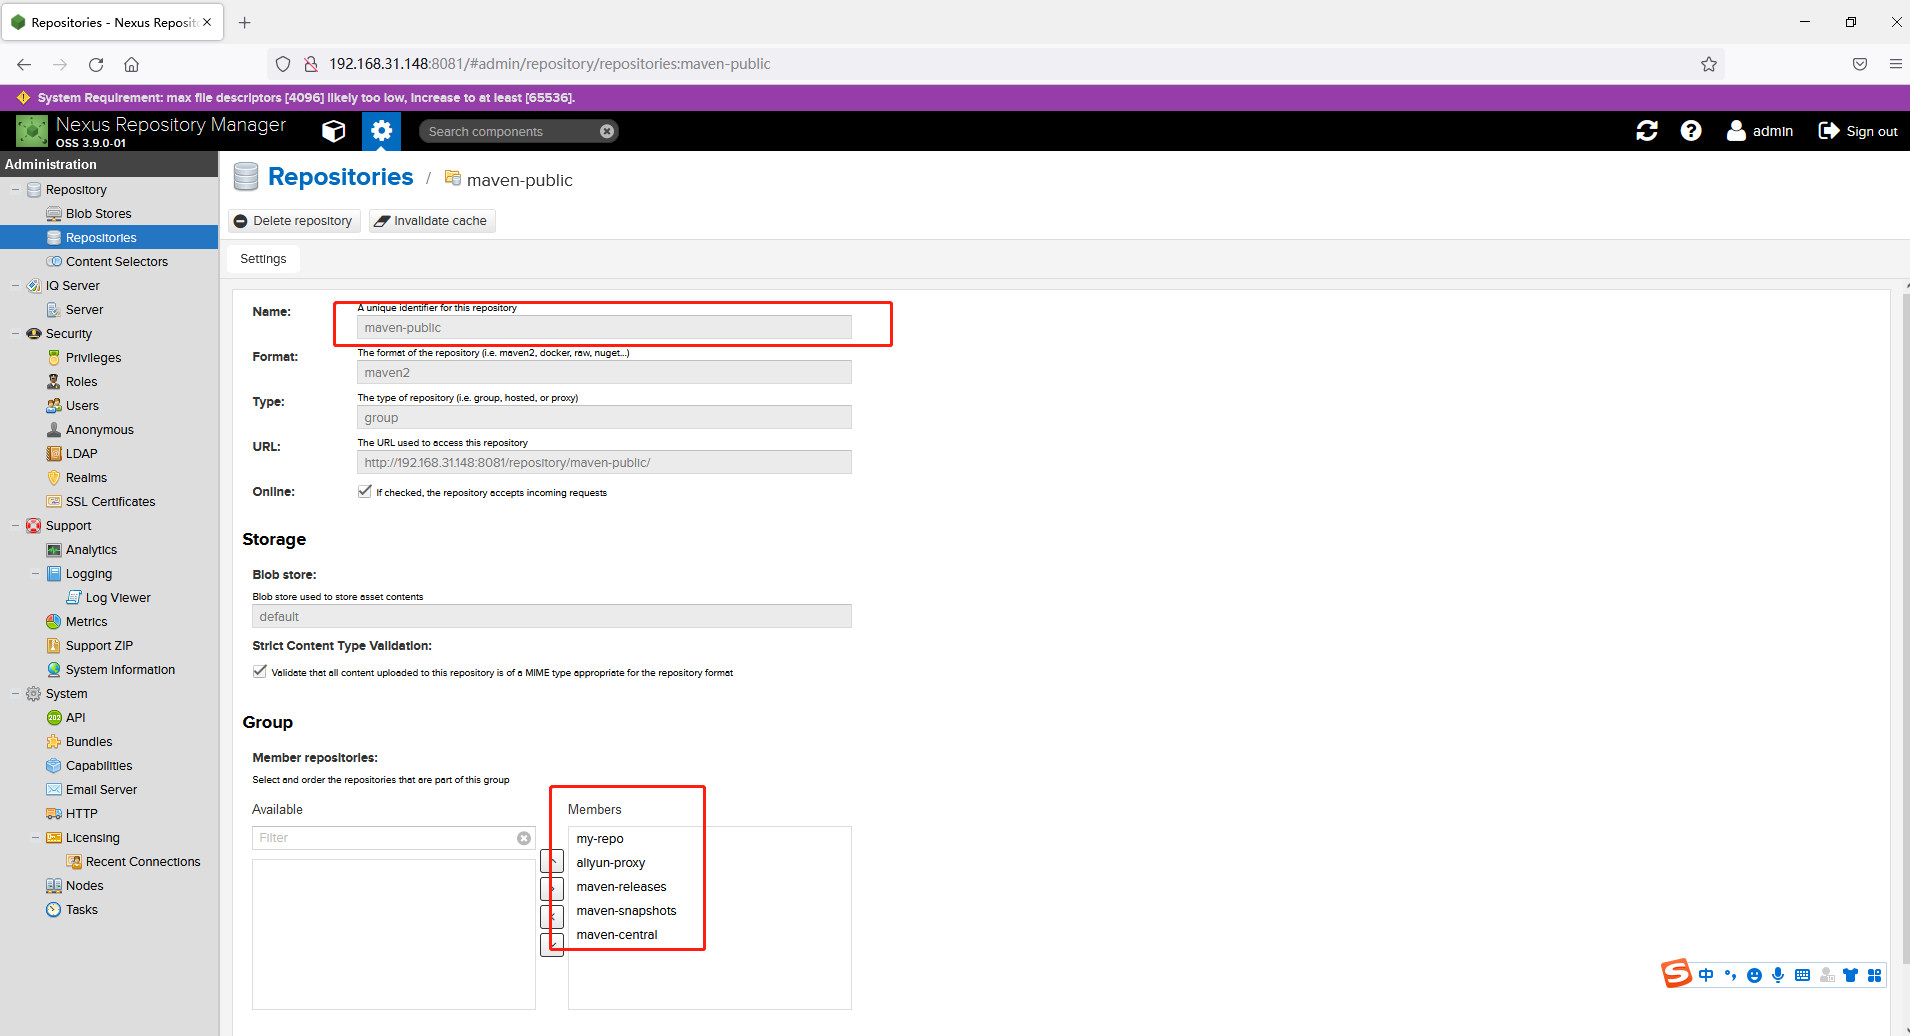
D:\JAVA\maven-repositorytrue -->false -->com.your.plugins --> optional true http proxyuser proxypass proxy.host.net 80 local.net|some.host.com --> deploymentRepo repouser repopwd --> siteServer /path/to/private/key optional; leave empty if not used. -->nexus-releasesadminadmin123nexus-snapshotsadminadmin123 mirrorId repositoryId Human Readable Name for this Mirror. http://my.repository.com/repo/path -->nexus*http://192.168.31.148:8081/repository/maven-public/alimavenaliyun mavenhttp://maven.aliyun.com/nexus/content/groups/public/central | or the command line, profiles have to have an ID that is unique. | | An encouraged best practice for profile identification is to use a consistent naming convention | for profiles, such as 'env-dev', 'env-test', 'env-production', 'user-jdcasey', 'user-brett', etc. | This will make it more intuitive to understand what the set of introduced profiles is attempting | to accomplish, particularly when you only have a list of profile id's for debug. | | This profile example uses the JDK version to trigger activation, and provides a JDK-specific repo. jdk-1.4 1.4 jdk14 Repository for JDK 1.4 builds http://www.myhost.com/maven/jdk14 default always --> | org.myco.myplugins | myplugin | | | ${tomcatPath} | | | ... | | NOTE: If you just wanted to inject this configuration whenever someone set 'target-env' to | anything, you could just leave off the inside the activation-property. | env-dev target-env dev /path/to/tomcat/instance -->nexusmy-repohttp://192.168.31.148:8081/repository/my-repo/truetruemy-repohttp://192.168.31.148:8081/repository/my-repo/truetruenexus alwaysActiveProfile anotherAlwaysActiveProfile -->nexus-releasesNexus Release Repositoryhttp://192.168.31.148:8081/repository/maven-releases/nexus-snapshotsNexus Snapshot Repositoryhttp://192.168.31.148:8081/repository/maven-snapshots/

本文来源:https://blog.csdn.net/qq_41062545/article/details/121642715
来源:本文内容搜集或转自各大网络平台,并已注明来源、出处,如果转载侵犯您的版权或非授权发布,请联系小编,我们会及时审核处理。
声明:江苏教育黄页对文中观点保持中立,对所包含内容的准确性、可靠性或者完整性不提供任何明示或暗示的保证,不对文章观点负责,仅作分享之用,文章版权及插图属于原作者。


全国统一热线: 025-81550000
地址:中国●江苏 南京市秦淮区洪武路359号1506室
邮箱:service#改成@jsedu114.com

微信公众号

新浪微博
暂不支持手机端,请登录电脑端访问