本文详细介绍了如何在Linux系统上安装和配置NGINX的ngx_http_geoip2模块,以阻止国外IP地址访问网站,包括安装依赖、下载模块、升级nginx版本、设置数据库、配置nginx文件以及测试验证过程。 ...
基于 NGINX 的 ngx_http_geoip2 模块 来禁止国外 IP 访问网站
一、安装 geoip2 扩展依赖
[root@fxkj ~]# yum install libmaxminddb-devel -yAI写代码bash1
二、下载 ngx_http_geoip2_module 模块
[root@fxkj tmp]# git clone https://github.com/leev/ngx_http_geoip2_module.gitAI写代码bash1
三、解压模块到指定路径
我这里解压到/usr/local 目录下
[root@fxkj tmp]# mv ngx_http_geoip2_module/ /usr/local/[root@fxkj local]# ll ngx_http_geoip2_module/total 60-rw-r--r-- 1 root root 1199 Aug 13 17:20 config
-rw-r--r-- 1 root root 1311 Aug 13 17:20 LICENSE
-rw-r--r-- 1 root root 23525 Aug 13 17:20 ngx_http_geoip2_module.c
-rw-r--r-- 1 root root 21029 Aug 13 17:20 ngx_stream_geoip2_module.c
-rw-r--r-- 1 root root 3640 Aug 13 17:20 README.mdAI写代码bash12345678
四、安装 nginx 模块
首先说明下环境,我的 nginx 版本是 1.16 , 在网上查了下 安装 ngx_http_geoip2 模块至少需要 1.18 版本及以上,因此此次安装我是 升级 nginx1.18,添加 ngx_http_geoip2 模块。
下载 nginx 1.18 版本
[root@fxkj ~]# yum install libmaxminddb-devel -yAI写代码bash1
解压 nginx1.18 软件包并 升级为 nginx1.18 ,添加 ngx_http_geoip2 模块
需要注意:
1、升级 nginx, 添加 nginx 模块 只需要 编译 然后 make 不需要 make instll 不然线上的 nginx 会被新版本 nginx 完完整整的替换掉
2、编译前 需要看下 nginx 当前安装了哪些模块
[root@fxkj tmp]# /usr/local/nginx/sbin/nginx -Vnginx version: nginx/1.16.0
built by gcc 4.8.5 20150623 (Red Hat 4.8.5-39) (GCC)built with OpenSSL 1.0.2k-fips 26 Jan 2017TLS SNI support enabled
configure arguments: –with-http_stub_status_module –prefix=/usr/local/nginx –user=nginx –group=nginx –with-http_ssl_module –with-streamAI写代码bash1234567891011
编译安装
[root@fxkj tmp]# tar -xf nginx-1.18.0.tar.gz[root@fxkj tmp]# cd nginx-1.18.0/[root@fxkj nginx-1.18.0]# ./configure --with-http_stub_status_module \ --prefix=/usr/local/nginx \ --user=nginx --group=nginx --with-http_ssl_module --with-stream \
--add-module=/usr/local/ngx_http_geoip2_module[root@fxkj nginx-1.18.0]# make[root@fxkj nginx-1.18.0]# cp /usr/loca/nginx/sbin/nginx /usr/loca/nginx/sbin/nginx1.16 #备份[root@fxkj nginx-1.18.0]# cp objs/nginx /usr/local/nginx/sbin/ #用新的去覆盖旧的[root@fxkj nginx-1.18.0]# pkill nginx #杀死nginx[root@fxkj nginx-1.18.0]# /usr/local/nginx/sbin/nginx #再次启动NginxAI写代码bash1234567891011
查看 nginx 版本 以及安装的模块
[root@fxkj nginx-1.18.0]# /usr/local/nginx/sbin/nginx -Vnginx version: nginx/1.18.0
built by gcc 4.8.5 20150623 (Red Hat 4.8.5-39) (GCC)built with OpenSSL 1.0.2k-fips 26 Jan 2017TLS SNI support enabled
configure arguments: –with-http_stub_status_module –prefix=/usr/local/nginx –user=nginx –group=nginx –with-http_ssl_module –with-stream –add-module=/usr/local/ngx_http_geoip2_moduleAI写代码bash123456789101112
五、下载最新的 IP 地址数据库文件
模块安装成功后,还要在 Nginx 里指定数据库,在安装运行库时默认安装了两个,位于 /usr/share/GeoIP/ 目录下,一个只有 IPv4,一个包含 IPv4 和 IPv6:
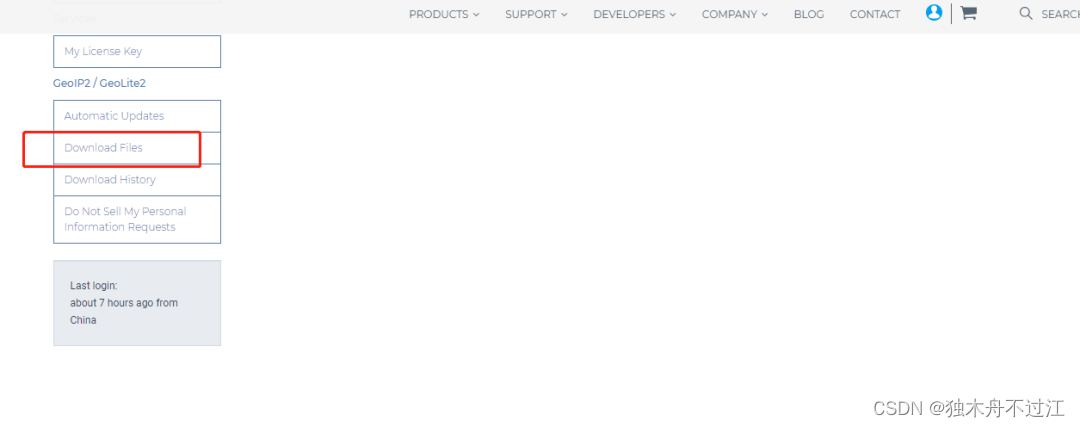
登录 www.maxmind.com 网址,创建账户 下载最新的库文件(账户创建就不演示了)
点击左侧 ,Download Files
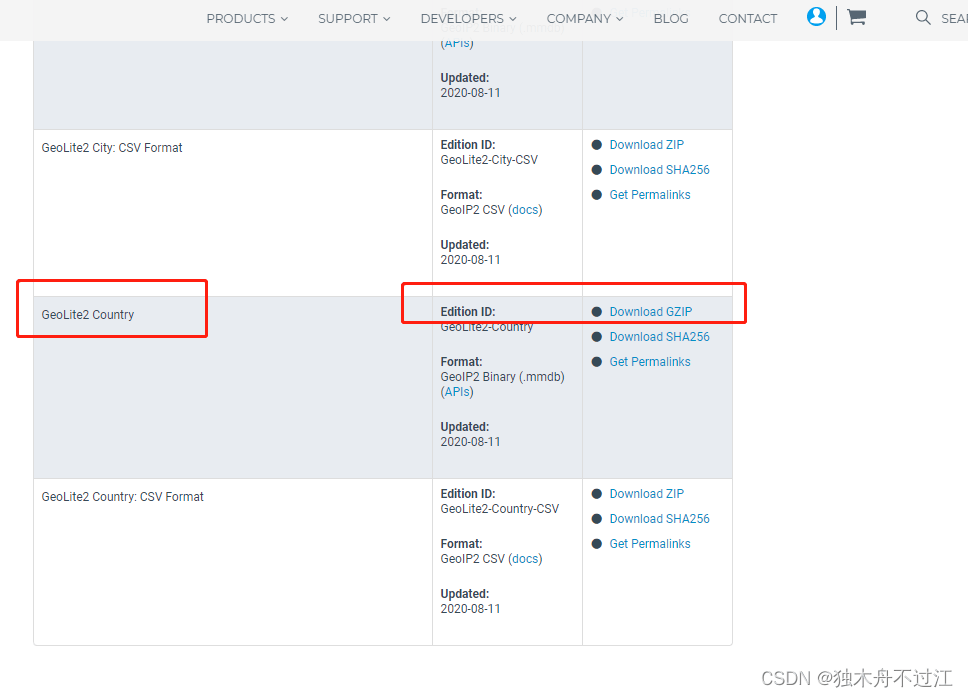
选择 GeoLite2 Country ,点击 Download GZIP 下载即可
上传到 /usr/share/GeoIP/ 下并解压
[root@fxkj local]# cd /usr/share/GeoIP/[root@fxkj GeoIP]# lltotal 69612lrwxrwxrwx. 1 root root 17 Mar 7 2019 GeoIP.dat -> GeoIP-initial.dat
-rw-r--r--. 1 root root 1242574 Oct 30 2018 GeoIP-initial.dat
lrwxrwxrwx. 1 root root 19 Mar 7 2019 GeoIPv6.dat -> GeoIPv6-initial.dat
-rw-r--r--. 1 root root 2322773 Oct 30 2018 GeoIPv6-initial.dat
-rw-r--r-- 1 root root 3981623 Aug 12 02:37 GeoLite2-Country.mmdbAI写代码bash12345678
六、配置 nginx 配置文件
修改前 先备份配置文件
[root@fxkj ~]# cp /usr/local/nginx/conf/nginx.conf /usr/local/nginx/conf/nginx.conf-bak[root@fxkj ~]# vim /usr/local/nginx/conf/nginx.confAI写代码bash12
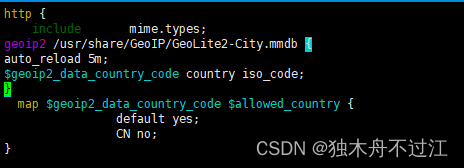
在 http 中添加 几行,定义数据库文件位置
geoip2 /usr/share/GeoIP/GeoLite2-City.mmdb {auto_reload 5m;$geoip2_data_country_code country iso_code;}
map $geoip2_data_country_code $allowed_country {
default yes;
CN no;}AI写代码bash12345678
在 server 中的 location 下 添加 条件
如果满足 IP 是国外 IP 就 执行下面的 return 动作,我这里定义了 3 种, 注释了其中两个。
当访问 IP 是国外 IP ,直接返回 404
if ($allowed_country = yes) { # return https://www.baidu.com; # return /home/japan; return 404; }AI写代码bash12345
修改完毕后, 检测下配置文件,重新加载下 nginx
[root@fxkj ~]# /usr/local/nginx/sbin/nginx -tnginx: the configuration file /usr/local/nginx/conf/nginx.conf syntax is ok
nginx: configuration file /usr/local/nginx/conf/nginx.conf test is successful[roo@fxkj ~]# /usr/local/nginx/sbin/nginx -s reloadAI写代码bash1234
7、模拟测试验证
使用海外节点的服务器去访问网站
这里我的 IP 是 来自于韩国
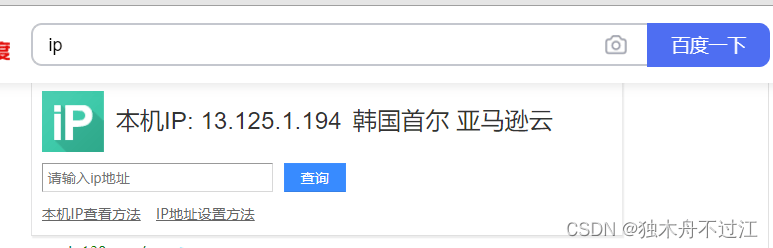
可以看到访问网站报错 404 Not Found
图片x
我们再来看下 nginx 的访问日志
“13.125.1.194 – – [14/Aug/2020:16:15:51 +0800] “GET /favicon.ico HTTP/1.1” 404 548 “https://www.fxkjnj.com/” “Mozilla/5.0 (Windows NT 10.0; Win64; x64) AppleWebKit/537.36 (KHTML, like Gecko) Chrome/84.0.4147.125 Safari/537.36”AI写代码bash1

至此,我们通过 Nginx 来实现禁止国外 IP 访问网站 就结束了~
原文来源:https://blog.csdn.net/dumuzhouguohe/article/details/137295395
来源:本文内容搜集或转自各大网络平台,并已注明来源、出处,如果转载侵犯您的版权或非授权发布,请联系小编,我们会及时审核处理。
声明:江苏教育黄页对文中观点保持中立,对所包含内容的准确性、可靠性或者完整性不提供任何明示或暗示的保证,不对文章观点负责,仅作分享之用,文章版权及插图属于原作者。


联系邮箱:service#改成@jsedu114.com
地 址:中国●江苏
南京市秦淮区洪武路359号1506室
Copyright©2013-2025 JSedu114 All Rights Reserved. 江苏教育信息综合发布查询平台保留所有权利
![]() 苏公网安备32010402000125
苏ICP备14051488号-3技术支持:南京博盛蓝睿网络科技有限公司
苏公网安备32010402000125
苏ICP备14051488号-3技术支持:南京博盛蓝睿网络科技有限公司
南京思必达教育科技有限公司版权所有 百度统计


 新浪微博
新浪微博